
Introduction
Connecting a React Native app to an API and MySQL database is a common setup for learning mobile development, building prototypes and developing applications before moving them to a production server.
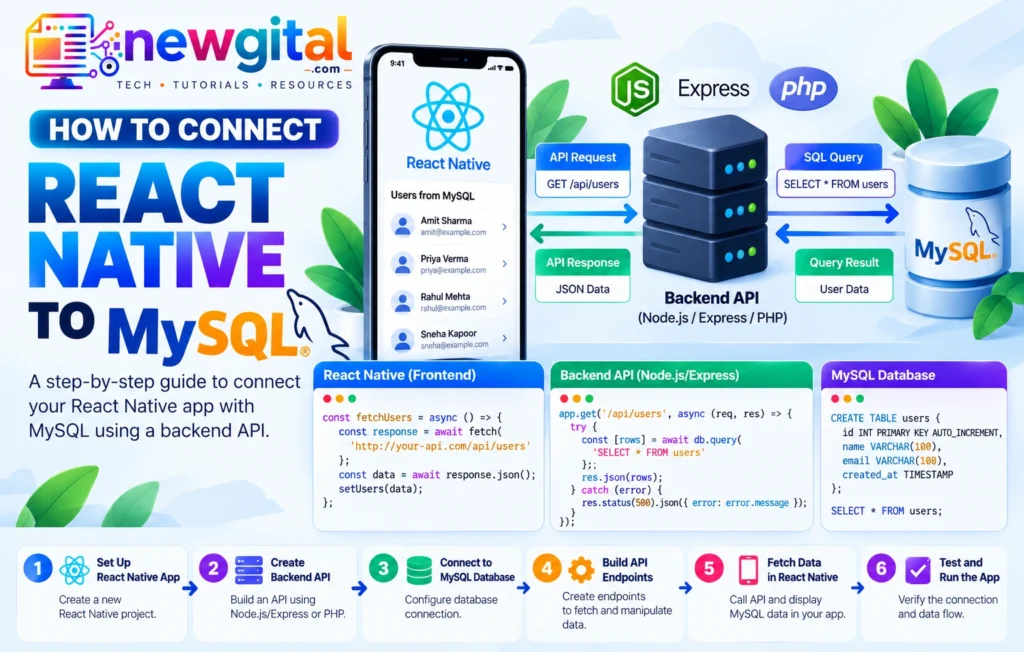
The important point is that React Native should not connect directly to MySQL. Instead, the app sends HTTP requests to a backend API and the backend communicates with MySQL.
The typical architecture is:
React Native app → REST API → MySQL database
What we need before starting
- Node.js and NPM
- React Native development environment
- Android Studio and an Android emulator, if testing Android
- Xcode, if testing iOS on macOS
- MySQL Server
- A code editor such as VS Code
- Basic knowledge of JavaScript and React Native
Here we will use a Node.js/Express backend because it provides a simple way to expose HTTP endpoints. Express defines routes such as GET and POST handlers, while MySQL stores the application data.
Understand the Architecture First
Before writing code, understand where each component belongs.
React Native (HTTP/JSON) → Node.js + Express → MySQL
For example, when a user opens a product screen:
- React Native sends
GET /api/products. - Express receives the request.
- The API queries MySQL.
- MySQL returns the rows.
- Express converts the result to JSON.
- React Native receives and displays the data.
This separation is important for security. Database credentials stay on the server instead of being embedded inside the mobile application.
Why React Native should not connect directly to MySQL
A mobile app is distributed to users, so anything embedded in the application can potentially be extracted or inspected. So MySQL database connection credentials must therefore never be placed in React Native code. The API acts as a controlled boundary between the app and the database.
The mobile app knows about only endpoints such as:
Endpoints are
GET /api/products
POST /api/products
The server knows about:
MySQL host
MySQL username
MySQL password
Database name
SQL queries
This architecture also makes it easier to add authentication, authorization, validation, rate limiting, logging, caching, and other server-side controls later.
Step 1: Create the MySQL Database
Open MySQL and create a database:
CREATE DATABASE react_native_demo;

USE react_native_demo;

CREATE TABLE users (
    id INT AUTO_INCREMENT PRIMARY KEY,
    name VARCHAR(100) NOT NULL,
    email VARCHAR(150) NOT NULL UNIQUE,
    created_at TIMESTAMP DEFAULT CURRENT_TIMESTAMP
);

INSERT INTO users (name, email)
VALUES
    ('Alice Johnson', 'alice@example.com'),
    ('David Smith', 'david@example.com');
Now we have a database named react_native_demo with a simple users table.
For a real project, use a dedicated database user with only the permissions the API requires rather than using the MySQL root account.
Step 2: Create the Local API
Create a separate directory for the backend:
mkdir react-native-api
cd react-native-api
npm init -y
Install Express and MySQL2:
npm install express mysql2
MySQL2 supports promise-based APIs and connection pools, which are useful for server applications. Its documentation also provides execute() examples for parameterized queries.
Create this structure:
react-native-api/
├── db.js
├── server.js
├── package.json
└── .env
For a production project, also consider a dedicated configuration module, validation, migrations, controllers, services and route files.
Step 3: Configure the MySQL Connection
Create db.js
const mysql = require('mysql2/promise');

const pool = mysql.createPool({
  host: process.env.DB_HOST || 'localhost',
  user: process.env.DB_USER || 'app_user',
  password: process.env.DB_PASSWORD || 'change-me',
  database: process.env.DB_NAME || 'react_native_demo',
  port: Number(process.env.DB_PORT || 3306),
  waitForConnections: true,
  connectionLimit: 10,
  queueLimit: 0,
});

module.exports = pool;
A pool lets the application reuse database connections instead of creating a completely new connection for every request. MySQL2 documents createPool() for this pattern.
Do not put real production credentials directly into source code. Use environment variables or a secret-management solution.
Install dotenv for local development:
npm install dotenv
Then create .env file
DB_HOST=localhost
DB_USER=app_user
DB_PASSWORD=your_local_password
DB_NAME=react_native_demo
DB_PORT=3306
API_PORT=3000
Add .env to .gitignore
node_modules/
.env
Step 4: Create the Express API
Create server.js file:
require('dotenv').config();

const express = require('express');
const pool = require('./db');

const app = express();
const port = Number(process.env.API_PORT || 3000);

app.use(express.json());

app.get('/api/health', async (req, res) => {
  try {
    await pool.query('SELECT 1');

    res.json({
      success: true,
      message: 'API and database are working',
    });
  } catch (error) {
    console.error(error);

    res.status(500).json({
      success: false,
      message: 'Database connection failed',
    });
  }
});

app.get('/api/users', async (req, res) => {
  try {
    const [rows] = await pool.execute(
      'SELECT id, name, email, created_at FROM users ORDER BY id DESC'
    );

    res.json({
      success: true,
      users: rows,
    });
  } catch (error) {
    console.error(error);

    res.status(500).json({
      success: false,
      message: 'Unable to load users',
    });
  }
});

app.post('/api/users', async (req, res) => {
  try {
    const { name, email } = req.body;

    if (
      typeof name !== 'string' ||
      typeof email !== 'string' ||
      !name.trim() ||
      !email.trim()
    ) {
      return res.status(400).json({
        success: false,
        message: 'Name and email are required',
      });
    }

    const [result] = await pool.execute(
      'INSERT INTO users (name, email) VALUES (?, ?)',
      [name.trim(), email.trim()]
    );

    res.status(201).json({
      success: true,
      user: {
        id: result.insertId,
        name: name.trim(),
        email: email.trim(),
      },
    });
  } catch (error) {
    console.error(error);

    res.status(500).json({
      success: false,
      message: 'Unable to create user',
    });
  }
});

app.listen(port, '0.0.0.0', () => {
  console.log(`API running on http://0.0.0.0:${port}`);
});
Express routes are defined by an HTTP method and path, such as app.get() and app.post().
The example uses MySQL2’s parameterized execute() calls. The ? placeholders keep user-provided values separate from the SQL statement and help avoid constructing SQL by concatenating raw input. MySQL2 documents this prepared-statement pattern for queries and inserts.
Step 5: Start the API
To run server
node server.jsWe must see something similar to: API running on http://0.0.0.0:3000
Before connecting React Native, test the API from local PC
Open in browser -> http://localhost:3000/api/health
A successful response should look like:
{
  "success": true,
  "message": "API and database are working"
}
Then test: http://localhost:3000/api/users
We receive JSON containing the users stored in MySQL.
If these endpoints do not work on the computer itself, do not move to React Native yet. Fix the API or database connection first.
Step 6: Connect React Native to the API
React Native provides the standard fetch API for HTTP requests, including GET and POST requests.
Create an API configuration file such as src/api/config.js:
export const API_BASE_URL = 'http://10.0.2.2:3000/api';Avoid scattering the API URL throughout the application. Centralizing it makes development, testing and production configuration easier.
Step 7: Fetch Users in React Native
Create a simple screen:
import React, { useEffect, useState } from 'react';
import {
  ActivityIndicator,
  FlatList,
  Text,
  View,
} from 'react-native';

import { API_BASE_URL } from './src/api/config';

export default function UsersScreen() {
  const [users, setUsers] = useState([]);
  const [loading, setLoading] = useState(true);
  const [error, setError] = useState('');

  useEffect(() => {
    const loadUsers = async () => {
      try {
        const response = await fetch(`${API_BASE_URL}/users`);

        if (!response.ok) {
          throw new Error(`HTTP ${response.status}`);
        }

        const data = await response.json();

        setUsers(data.users);
      } catch (err) {
        console.error(err);
        setError('Unable to load users.');
      } finally {
        setLoading(false);
      }
    };

    loadUsers();
  }, []);

  if (loading) {
    return <ActivityIndicator />;
  }

  if (error) {
    return <Text>{error}</Text>;
  }

  return (
    <View style={{ flex: 1, padding: 20 }}>
      <FlatList
        data={users}
        keyExtractor={(item) => String(item.id)}
        renderItem={({ item }) => (
          <View style={{ marginBottom: 16 }}>
            <Text>{item.name}</Text>
            <Text>{item.email}</Text>
          </View>
        )}
      />
    </View>
  );
}
The request flow is now:
UsersScreen
    ↓
fetch()
    ↓
GET /api/users
    ↓
Express
    ↓
MySQL
    ↓
JSON response
    ↓
setUsers()
    ↓
FlatList
Step 8: Send Data From React Native to MySQL
To create a user, use a POST request:
const createUser = async (name, email) => {
  const response = await fetch(`${API_BASE_URL}/users`, {
    method: 'POST',
    headers: {
      Accept: 'application/json',
      'Content-Type': 'application/json',
    },
    body: JSON.stringify({
      name,
      email,
    }),
  });

  if (!response.ok) {
    throw new Error(`HTTP ${response.status}`);
  }

  return response.json();
};
You could call it from a button:
const handleCreateUser = async () => {
  try {
    const result = await createUser(
      'Sarah Williams',
      'sarah@example.com'
    );

    console.log(result);
  } catch (error) {
    console.error('Create user failed:', error);
  }
};
React Native’s networking documentation shows the same general pattern: specify the HTTP method, send JSON using JSON.stringify(), set Content-Type: application/json and handle the asynchronous response.
Step 9: Test on a Physical Device
When testing on a real phone, replace the emulator-specific address with the development computer’s LAN IP.
For example:
export const API_BASE_URL = 'http://192.168.1.20:3000/api';Make sure:
- The phone and computer are on a network that allows them to communicate.
- The API listens on an address reachable from the network.
- Your firewall allows the API port.
- The phone can reach the computer’s IP.
- The API is actually running on port
3000.
Because the example server listens on 0.0.0.0, it can accept connections through the computer’s network interfaces rather than only through the loopback interface.
Step 10: Test the API From the Phone
Before debugging React Native code, test the API from the device’s browser.
For example:
http://192.168.1.20:3000/api/healthIf the browser cannot load the endpoint, React Native will not be able to load it either.
This simple test helps separate:
- React Native problems
- API problems
- network problems
- firewall problems
- database problems
Common Connection Problems (Errors)
- Network request failed
localhostworks on the computer but not the phone- Connection refused
- MySQL access denied
- MySQL database does not exist
- Duplicate email
The sample database defines email as UNIQUE, so inserting the same email twice will produce a database error.
A production API should detect expected constraint errors and return an appropriate HTTP response such as 409 Conflict rather than exposing raw database errors to the client.
Security Best Practices
A local API is useful for development but follow production security principles from the beginning.
- Never expose MySQL credentials
- Use parameterized SQL
- Validate input on the server
- Required fields
- Data types
- Length limits
- Allowed values
- Email format where appropriate
- Authorization rules
- Use HTTPS outside local development
- Add authentication when required
- Restrict database permissions
- Do not return raw database errors
Detailed SQL errors can reveal implementation information. Log details on the server and return safe messages to the client.
A Simple End-to-End Test
Once everything is running, follow this sequence.
- Verify MySQL
- Verify the API
- Verify the users endpoint
- Verify the mobile API URL
- Run React Native
- Open the users screen
- Create a user
Submit the POST request from React Native.
Then verify in MySQL:
SELECT * FROM users ORDER BY id DESC;If the new row appears, the complete connection is working.
Keep database credentials on the server, validate input on the API, use parameterized SQL, test the backend independently, and use HTTPS for production. With this foundation, we can extend the same architecture to authentication, CRUD operations, file uploads, pagination, search, notifications, and more complex React Native applications.